|
Clyde Deluxe Wah: Perfect
Or Leeway For Improvement? Adding Controlled Impedance Buffers To A Fulltone Clyde Deluxe Wah I last update: April 30 , 2022 Copyright 2020-26 by
H. Gragger. All Rights Reserved. All information
provided herein is destined for educational and
D.I.Y. purposes only. Commercial re-sale,
distribution or usage of artwork without explicit
written permission of the author is strictly
prohibited. The original units with their
associated trade-names are subject to the
copyright of the individual copyright owner. The
Author is by no means affiliated with any of those
companies. References to trade names are made for
educational purposes only. By reading the
information provided here you agree to the Terms
of
Use. The working language
is kept in English as an aid. Read here
why.
|
||||||||||||||||||||||||||||||||
| MAIN PAGE>MUSIC STUFF>CLYDE Index
Tripping Over The Wah Pedal And Fixing The Pot Recently I tripped over my wah pedal, which has been living a quiet life for a long time. Needless to say, the pot was gone scratchy, not from permanent abuse, but from lying around. I looked for a new pot, alas Fulltone makes it really cumbersome to obtain one. You have to proof that you own a pedal by making a video and such rigmarole. There is a plethora of wah pots available, but there is also endless discussion as to which is best. Fulltone claim this is some special product, others think different. We have to believe it. It is of course beyond discussion that using a pot this way is an abuse right from the start. Since it was already sentenced to death I could just as well try the magic spray healing. I ordered Deoxit D-5 (the 5% solution) and some Fader 100 (which is 100% of the brew). The first step strips all residue and the second one lubricates again. Gone is the crackling, but the useful friction too. Tightening the treadle´s nylon lock nut helps a little, but making the plastic flange, that looks like a cable tie, press harder onto the gearstick, did the trick. This spray cure is by the way a procedure recommended by Fulltone himself. Never use any WD-40 or other strange stuff. WD-40 essentially consists of de-greasers! If your pot is finished mechanically, the cure will only be temporary. D-5 strips all gunk from the pot track in a beneficial way, but also removes lubricant, which will speed up wear. D-5 lubricates a little, but not enough. Re-lubricating with Fader 100 is technically correct, but leaves you with less track friction than you need. Fader Grease works much better for controlled friction.Since my pot cannot possibly have gone bad by excessive usage, this may as well have been the end of that story. And no, I do not receive money from any of them. To the contrary, it costed me a lot. But this is just as an aside to the story that ensued. Back To Index Incompatibility Issues And Looking Around I ran the wah into my butterscotch fuzz to see how this behaves with a wah in front, since not all distortion units sound good this way. The wah sounded inferior. No, it was not the fuzz unit, it was the wah´s problem. Its range was constricted and tone left a lot to be desired. I suspected an impedance problem and this turned out to be the case. I plugged a mobile buffer in between them and this cured all problems. This then kindled my interest in the innards of the Clyde wah to see what can be improved.
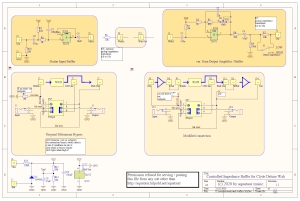
So what is there? There is one schematic floating around the internet that somebody drew after reverse engineering the Clyde Deluxe (apparently the first generation version without the output adjustment). Looking at this you would have thought they had invented something new, but the schematic mentioned was just drawn in a way that was confusing. I looked closer and compared it to other devices and it turns out, it´s just a plain 50 years old wah adorned with some bells and whistles. This was quite sobering to me, since they create an appropriate illusion (like everybody does). There are several approaches[1] in the public domain, that end up quite similar. One of them that has been documented well is the Weener Wah by Madbean (which I suspect is a clone), and this then grew my reference schematic. Those improvements over the age old originals boil down to
The Weener Wah has a 10k resistor in series with the output, which goes without further attention. This however deserves mentioning since it adds source impedance to the output in the magnitude of a pickup´s wire resistance, which will drive the tiredest fuzz face nicely without choking it. Any volume loss encountered by the 10k drive impedance over a fuzz face´s 2k input impedance can then be counteracted with the variable output gain control. For a "modern" high impedance input following, this will be redundant. The current Clyde Deluxe model has all this built in, although I do not know about output impedance. Many people sell a mysterious wah buffer retrofit circuit with magic impedance match, which in my opinion is snake oil that can be reduced to exactly that:
10k source (drive-) resistance or thereabouts is a value you would expect from a guitar pickup, so this creates comparable conditions for subsequent effect pedals. I have seen resistors up to 50k in this position:
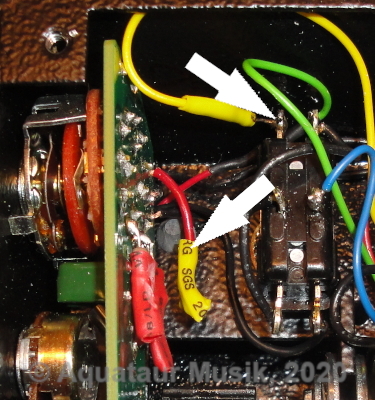
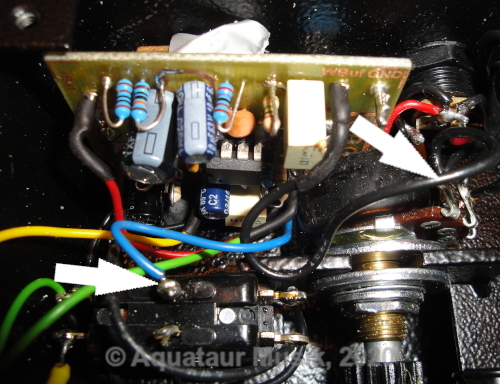
So that is the the bread and butter... Other observations: on the original, upon changing the vocal cap selection, you might experience howls due to the rotary switches´ contacts that go momentarily intermittent. The Weener Wah has a few 10M resistors there to minimize this. You can retrofit this on the fly easily. This changes nothing in tone. Long story cut short, I went to upgrade my wah to a better than current commercial version with a buffer board. Back To Index Reaping The Harvest And Setting The Course For The Better First obstacle to PCB making was to find out what was inside and what was going where.
For a buffer, that is meant to be transparent, I cannot find any rational excuse for it to be discrete. Even worse, some very basic self-biasing j-fet arrangements that have been used frequently in the past[2] may invite headroom problems[3]. So an op-amp will perform very nicely and unobtrusive. Even more so for a buffer with gain. There are three approaches[4] to variable gain, I chose a variable gain amplifier for maximum headroom and no input/output impedance tampering. A full boost and cut approach carries the risk of clipping, whereas a cut and full boost approach does a bad job on impedance. Although a very simple j-fet self-biased buffer would be perfectly feasible before the wah circuit, this would appear ridiculous in the vicinity of an op-amp already there. EDIT: I had been on the hunt for the Foxrox gadget for a long time, knowing in my heart that it was not the witchcraft they claim. I finally found it on FSB[11], and although we do not know if this is really the source, it is entirely plausible. This circuit has the advantage that it has variable input gain (passive) and a gain of 2, so you can attenuate or boost ad lib.Controlled output impedance The output buffer will be functionally equal to Madbean´s version, but with a fixed output impedance Note that the Weener Wah buffer, suffers from variable output impedance due to the variable resistance following. The self biasing j-fet also possibly promotes clipping of large signals. The 10k series resistor adds to the natural drive impedance dictated by the j-fet´s drain resistor, which however is, dependent on the chosen j-fet, inpredictable.As different to the Weener Wah, which can bypass the output buffer entirely, I do believe the output buffer´s high input impedance is beneficial to the wah circuit in all circumstances, so there is no provision made to bypass this altogether (and drive the subsequent stomp box directly, as the original did). I think this would be a step back. For a stock fuzz face an elevated drive impedance in the magnitude of a pickup´s resistance is mandatory for the fuzz face to operate as expected, whereas a "modern" high impedance input will remain largely unaffected by this. However, bypassing the output impedance by providing a low impedance drive may proof useful one day. Provision is there my means of the switch. As we will see, controlled output impedance is also useful for the input buffer. Input buffer Also, there is nothing to be gained by driving the wah without input buffer sound wise. In earlier days they had wahs equipped with output switching only, meaning the input´s load was attached permanently, even when the wah was off. People complained about tone degradation which was counteracted with an input buffer, that was permanently in line despite the footswitch´s position. Maybe a suitable switch was not available back then, or not at a reasonable price. So if there was tone degradation perceived, it is there, although some feel differently[7]. I agree that buffer after buffer makes no sense. But it makes sense, for example to buffer the guitar´s pickup from the capacitive cable load, plus from any alleged resistive input load that would render the volume control useless.Isolating the wah circuit from the device before is always a good idea, since this creates a controlled environment. So a buffer goes there too into the bargain. We D.I.Y.´ers are not pushed by the penny. Another argument that definitely speaks for an input buffer, is noise:
Needless to say, the pulldown resistor (previously external antpop resistor) resides on the new PCB, so the extra cabling is redundant. A pulldown resistor with similar function is placed on the output (100k) which is also needed to make the annunciation circuitry working.
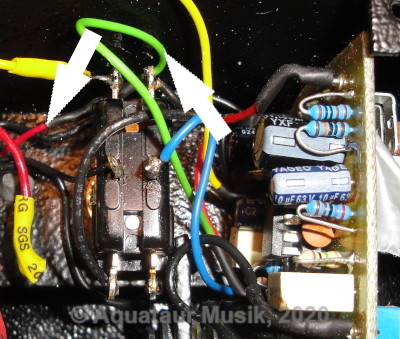
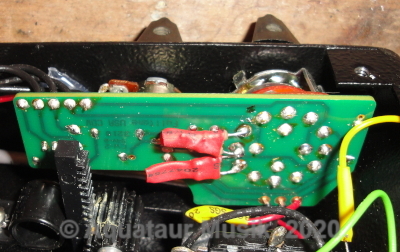
Back To Index Installing The New PCB The new PCB is mounted directly onto the pot and the switch, which holds it firm in its position. This incidentally is the same position Fulltone have chosen for their new Deluxe model. As mentioned earlier, the 2PDT footswitch is a valid full bypassing scheme, so no need to change this. The prerequisites for the bypass switchs´ state detection are unchanged, so LED annunciation will continue to work as before. Look up the description below to understand how that works[6]. Note this version of a bypass switch does not null the input as contemporary switching schemes do. However since there is no high gain circuitry involved, noise buildup and interference caused by a floating input is not to be expected.Power conditioning on the original is a shame (again, an age old construction). It has been upgraded with better power supply filtering on the buffer board. This is so dirt cheap it makes you wonder... I realize I should have made pictures prior to the upgrades, before and after.
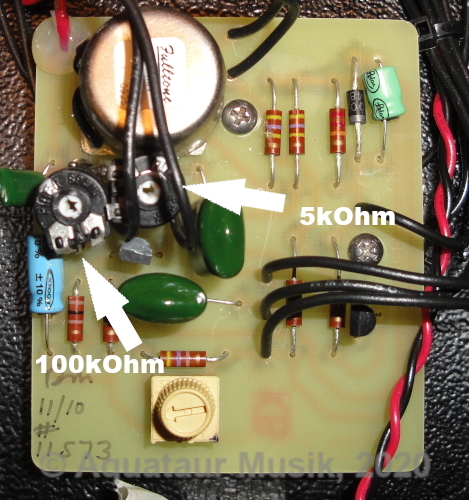
The original trim pot (towards the bottom on this picture) sets the basic bass content that gets through. This interacts with the gain pot on the outside of the shell. If you feel the guitar´s bass overloads a subsequent overdrive, turn up the gain control. Back To Index Verdict The new circuit works as expected - perfectly. When I did drive the Butterscotch Fuzz with the wah earlier, its medium load (100k) changed the wah´s tone dramatically. I now can drive subsequent dirt boxes no problem, with neither tone degradation on the wah side nor the fuzz side. Output gain at minimum position is slightly greater than one, so for high impedance devices it can remain there. Funny effects when switching the caps are minimized. LED annunciation works as before. Functionally the wah is now at least en par to Fulltone´s current Deluxe model. Very likely superior, because my circuit aims for the best result and is not money-driven. The pedal is very well made mechanically, the inductor is screened with mu-metal to avoid hum intrusion. Wheter the well advertised long-life wah pot lives up to its expectations, we will see. I would not hesitate to try any other quality ICAR type pot. Altogether a hell of a wah device. Back To Index Wah And Fuzz New fuzzes, new challenges. In my opinion wah > fuzz sounds much better than fuzz > wah. The subsequent unit always dominates the overall sound. Two factors work generally against a useful combination of that:
Again I looked into the magic crystal ball to see how people go about this. It was not before today that I saw in a YT video, that Hendrix (allegedly) used a very long cable between the wah and the fuzz (around 1:40)[9]. This is by the way one of the mysteries to some - how come Hendrix´ Fuzz did not howl? To me it´s quite clear. Roger Mayer had the Wah buffered. They don´t tell us all their trade secrets.In the author´s opinion this was Hendrix' attempt to cure the impedance incompatibilities that invited the wolves first hand. But his assumption is condemned to fail for two reasons:
I immediately remembered that the Weener Wah[1] has a capacitor directly on the output - after the 10k resistor. I had not understood its purpose at the time, but in this light it makes more sense. The wah,
when activated, is
overly shrill on the
toe-down position. I
always disliked this
intense treble. Any
subsequent high gain
pedal (and you can
bet there is one...)
can exaggerate that
even more. I was
never very happy
with that tone.
To cut it short, a 15nF capacity (introducing a 1 kHz rolloff, as hefty as this may seem) directly on the output of the buffer (after the magic 10k resistor) removes most of this shrillness. Adjust to taste. Since this was a retro-fit, the most convenient position of fitting it was directly onto the bypass switch. Simultaneously I moved the gear wheel on the wah pot one notch further towards darker[8]. This results in a toe-down position tone that is just slightly brighter than in the off position. This has no influence on either the bypassed signal nor the impedance toggle switch position. But (as mentioned above) there is more to a good wah > fuzz tone. I noticed that particularly upon the heel back position there was a huge energetic thump coming from the wah circuit that drove all subsequent fuzzes nuts, Axis and Fuzz Face the like (regardless of the rare earth used that comprised their transistors). There is a difference between a "clean" system and a "dirty" sound. Distortion boxes, particularly ones that react sensitive to picking dynamics (like the Axis Fuzz) respond immediately (harsh) if fed with a narrow band of high energy - like a resonant mid filter. This results in a dramatically reduced perceived sweep despite the correct impedance matching. Like with all distortion units, you want to cut bass to keep tone defined, so keep Q1 gain (and bass content) low by dialing the trim pot back. I revisited the (retrofit) trim pot settings for mid range and Q and saw that I had added a considerable amount of mid range and also higher Q. I had exaggerated the problem despite the fact that it produced a great clean tone, so I ended up using the stock settings. Now when I activate the Clyde, my tone is slightly less bassy than the bypass tone. This helps the fuzz. Listen closely to Hendrix recordings, he as the wah pretty much on the trebly side. In general, in a band context what is asked for is midrange for the lead guitar. Only we bedroom rockers, who plunk on their own, like to hear our guitar full range...So cutting bass helps somewhat, but Bob Gjika´s solution[10] works far better. I have not seen it before. He uses a stalled Univibe (with depth on zero) inbetween and the toggle switch on vibrato. Although he suggests using it as remedy for an impedance mismatch, it actually evens out the midrange peaks. In fact, a thusly set Univibe sounds pretty neutral. I have tried this with my Photon Vibe, this works brilliant (in fact I managed to dial out the slight mid-cut by taking treble and bass pots back and raising the level just a smidge). For the time being there is no better solution than using a Univibe (clone) as man-in-the-middle to fix the wah > fuzz problem. Back To Index The subsequent recordings have been done using the following setup and no further processing:
A few quick and nasty takes. No exercise in timing or else, just to demonstrate the effects. Excuse the amateur playing. Crank you speakers. Sounds darker on my Hifi than live.
Back To Index [1] some designs similar to the Deluxe Wah in the public domain:
https://fuzzcentral.ssguitar.com/mccoy.php [3] Jack Orman (AMZ): Wah pedal buffer, http://www.muzique.com/news/wah-pedal-buffer/ [4] Jack Orman (AMZ): Boosters, Gain and Distortion (why booster pedals do not all sound alike), http://www.muzique.com/lab/boost.htm [5] R.G. Keen (GEO): The
Ins and Outs of Effect Bypassing, Update History
MAIN PAGE>MUSIC STUFF>CLYDE |
||||||||||||||||||||||||||||||||
| MAIN PAGE | MUSIC STUFF | IMPRESSUM (c) 2020-26 AQUATAUR Musik & Elektronik |