|
D.I.Y.
Six String Electric Lapsteel presenting... The Aquataur Pioneer Model last update: Apr. 5, 2012 Copyright
2012-25 by H.
Gragger. All Rights Reserved. All information
provided herein is
destined for educational and D.I.Y. purposes only.
Commercial re-sale,
distribution or usage of artwork without explicit
written permission of
the author is strictly prohibited. The original
units with
their
associated trade-names are subject to the
copyright
of the individual copyright owner. The Author is
by no means affiliated
with any of those companies. References to trade
names are made for
educational purposes only. By reading the
information provided here you
agree to the Terms
of
Use. The working
language is kept in English as an aid. Read here
why.
|
| MAIN PAGE>MUSIC
STUFF>LAPSTEEL Index  Pictures 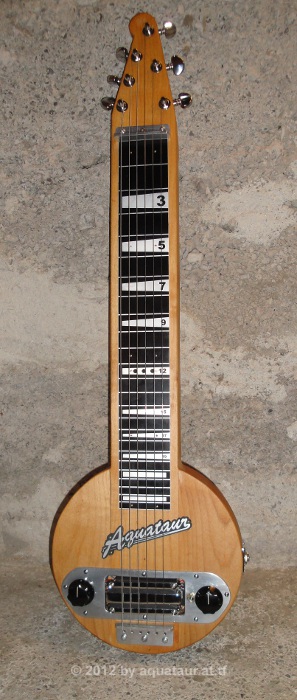
The Aquataur Pioneer Lapsteel. Click on the images to view enlarged versions.
Accompanying Case. Click on the images to view
enlarged versions.
Back To Index Buying Or
Making?
Things that are alive permanently change. If they don´t, they will deteriorate and eventually die. My music style permanently changes too, although there are some focus points. Sometimes Sixties´ rock music gets me, sometimes country, country rock and Hawaiian. This may seem contradictive, but it is not. All those genres had musicians that touched my heart. For this reason I sometimes focus to the Stratocaster, sometimes on steel guitars. Although I have been playing lapsteel and pedal steel for quite a time, there are always new ways, new tunings to explore. Pedal steel guitar tunings are more or less standard, but not so with the tunings of their predecessors, the lapsteels, which is why people ended up with multiple-neck guitars. However, many of those tunings are harmonically interrelated, meaning that with a little tuner twiddling you can dial them in on the same guitar. No need to have a separate guitar for all the tunings, for evaluation purposes at least. Buying a guitar is really a simple decision. If you can afford, you buy an expensive (and hopefully well made) guitar. If you can´t, you buy a cheap thing which may even be playable. Astounding what is available cheaply due to CNC cutting and manufacturing in China, which is slavery of course. Doing it yourself is only of interest, if you want to make the experience. It will never be cheaper. You can´t compete with mass-production. Nevertheless, utilized material (wood, tuners, pickup etc.) may be lousy. So I decided to make my own. This process is not as complicated as it may seem, because there are no ultra-critical parts on it (like the neck on a standard electric guitar would be, which will make or break a good guitar...). An electric lapsteel is basically just a wooden plank without resonance body. A basic lapsteel can be built according to the descriptions in an excellent book by Martin Koch, It's easy to Build Your Own Lap Steel Guitar. The whole instruction guide for the basic model is available online, just look through the website. This will enable you to build an exact clone of the basic model or a revised model, as I decided to do. Back To Index A Few
Initial Shaping Decisions
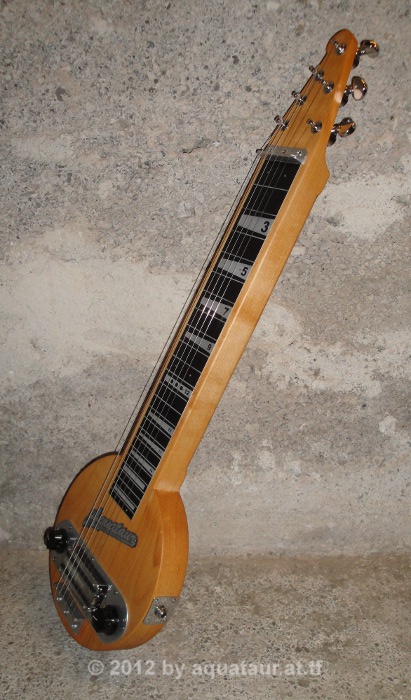
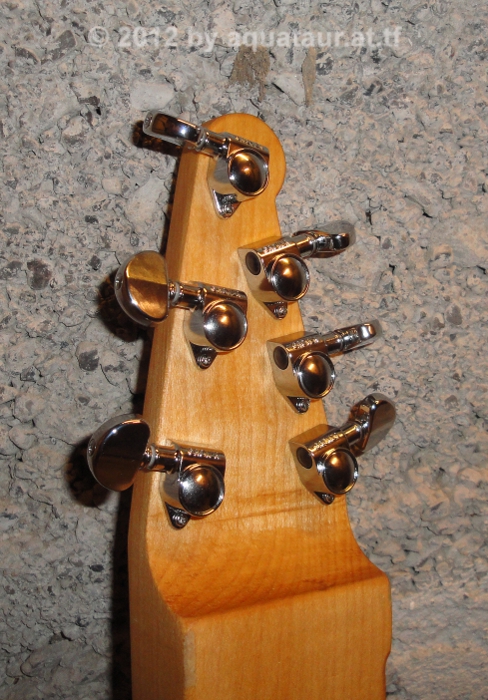
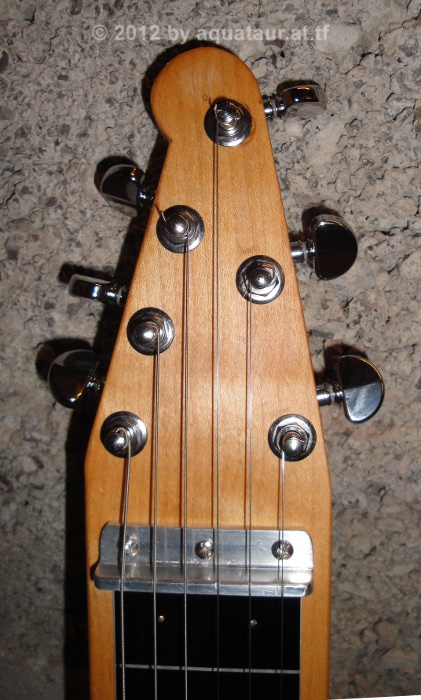
Many decisions made on the optical design and practical layout of (lap) steel guitars stem from the fact that their manufacturers too often adhere to their heritage from real guitars to appeal a certain clientel. Pedal steels deviate from that concept considerably, which allows for proper tools of the trade. I agree that a tapered neck looks better on a guitar, but this should not get in the way of playability and should therefore be the first thing to be dropped if a good design were to be pursued. My guitar thus is optimized for the purpose of playing Hawaiian music style to the specs of Jerry Byrd, a well known (now deceased) musician in that genre. He is reported to have mentioned that optimal string spacing is 3/8 inch, which differs from the (wider) standard guitar spacing. There is no tapering towards the neck, which promises optimal bar slanting throughout the neck in conjunction with a 22.5 inch scale. The guitar is made of maple which is a ubiquitous domestic wood hereabouts. I obtained a big plank from a local wood distributor and had it cut and planed down to size on a local professional woodshop for a baksheesh. Enough wood left for two more guitars. The guitar is a through-neck type with the "body" glued onto the neck. Final neck diameter is 40x80 mm, final length approximately 700 mm. The tuners have been spaced out on the headstock in a way that all strings wind up straight, which promises better tuning stability. Machine heads are made by Grover, 1:14 gear. Bridge and nut are made of 4mm angled aluminium stock. This gauge seemed more up to the task then the recommended 2mm aluminium stock The strings are going through the bridge and the body and are secured on the other side by recessed ferrules. I had a feeling that through-body strings yield better sustain. Since the string spacing is custom, standard ferrules for electric guitar won´t work. I used the heads of stainless steel pop rivets and mounted them recessed. Those work a treat and are readily available. For pickup did not use a standard guitar guitar pickup as suggested in the construction manual. #1 the string spacing I chose is not compatible with standard pickups with pole pieces, #2 I like single coil tone but not their noise susceptibility and #3 I do not like humbucker tone. The basic lap steel model depicted in the book practically consists only of a neck without body. Its width results from the necessity of accommodating a stock single coil pickup rather than stability issues. This is by the way also the simplest arrangement for somebody with limited access to tools and workmanship. Any bigger sized (serious ;-) ) pickup would inevitablly increase neck proportions, which does not look good for a lap model. Since I opted for a different pickup, more options for neck and body proportions were the viable. Headstock shape also needs to be thought about, since this adds to overall size and pleasant proportion. Back To Index Headstock When you look at a guitar´s headstock you would never think that there were rational arguments behind selecting a headstock shape, but there are.
Not all those demands
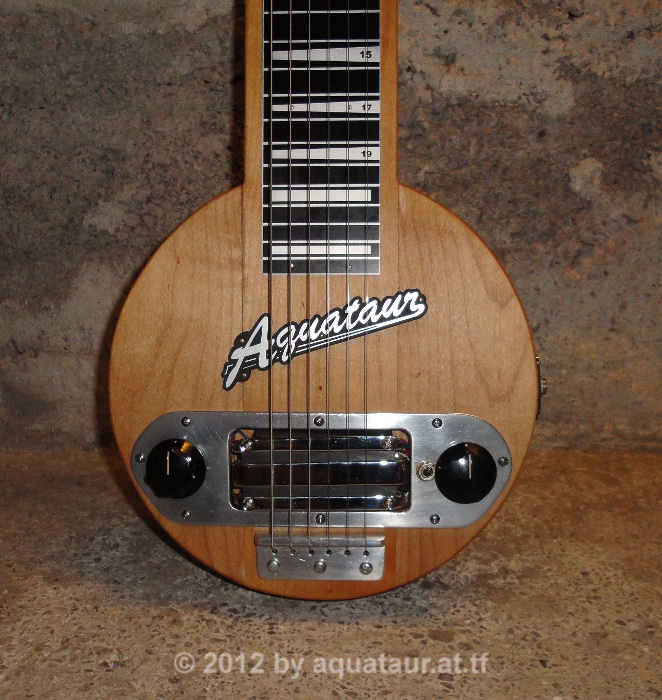
can be equally satisfied, so compromises are in
order. Pickup Choice I chose a Lace Alumitone Bass-Bar 3.5. They have a product called "Tonebar" which is destined for pedal steels or lapsteels with a larger number of strings, however, the Bass-Bar series (for bass guitar) looks identical and according to Lace, is identical except marketed differently. Those pickups have gotten good reviews by people who like the single coil sound but end up arranging with a humbucker for lower noise. A Bass-Bar 3.5 has due to the much bigger string spacing on bass guitars ample coverage for 6 string and even 8 string lapsteels with a comparable string spacing. The very size of this pickup practically prohibited making an exact clone of the instruction guide (which suggests a neck 100 mm in size). Making the neck any broader would look very awkward for a lap steel, so I decided to go for a makeshift body that would be easy to make with the limited amount of tools I have plus look appealing. The frying pan is a proven design and easy enough to make, so why re-invent the wheel? I decided to use a two-way tone control. In its center position, tone is unaffected. Towards the sides different caps get into play. Fully ccw or cw the cap will form a resonant circuit with the pickup coil, which adds a new tone color. I have used a rotary switch with different small capacitors for similar applications before, but dependent on the pickup this tends to develop a high Q circuit which sometimes sounds nasal and unpleasant, so I avoided this. The two-way tone control provides a very effective and usable range of tones. Listen to the sound files. The 22 nF tone cap recommended by Lace is much, much too big for my taste. Almost always I install much smaller caps for tone in guitars than the ones recommended. The pickup is very full-bodied anyway and tone gets very dull and unusable with that big sized caps. I used a 10 nF on one side and a 4.7 nF for the other side. The Lace site is not very up to date with their drawings, moreover the Bass Bar´s specs do not coincide with what finally comes: this is more like a splittable Alumitone. However, this is a good thing, because the Bass Bar actually features coil tapping and this sounds usable. I therefore installed a SPDT toggle switch as recommended for their humbuckers that allows for a single-coilish tone versus a humbucker-like tone. I say -ish tone, because the technology is much different than what comprises a stock splittable humbucker. Its coil splitting does not do exactly do what one would expect from a split coil humbucker, because you are only tapping the secondary coil. Since the pickup is canceling hum in its transformer primary circuit it is hum canceling independent of what you select on the secondary side. I thus prefer to call it full coil resp. half coil tone. A truly ingenious and innovative design. However, their circuit provides two different sounds akin to humbucker splitting. Both settings are eminently usable and, as promised, work indeed without big volume step between them as promised. Have a listen to the tone control evaluation clips in the sound samples. The sales argument that aluminium is a much better conductor and is simply wrong. Copper is the better conductor. However, since the whole frame acts as a single winding, yes, this will conduct better than the thousands of turns of copper wire thin as a hair on a stock pickup. How environmentally beneficial is it to save on copper in favor of aluminium for a device like that? Pull the other one folks its got bells on it. At least they seem to pass their claimed savings in resources onto the customers, because the pickups are not very pricy compared to "acclaimed" steel guitar pickup winders. However, no need for ridiculous sales arguments, since the pickup speaks for itself. This pickup is current driven rather than voltage, but its impedance has to be matched with an upwards audio transformer afterwards. This transformer is very small and consists of the before mentioned two coils. The argument that this yields a low impedance drive I find hard to follow because with both coils on, you end up with a 5k impedance which is exactly what a stock single coil pickup has. I have also read that that is supposedly better for driving effects. Try this with a stock fuzz face. Good luck. To see those arguments repeated over and over by reviewers makes me wonder, if the paper these reviews are printed upon are worth the ink, and ultimately - how knowledgeable those reviewers are. But these are all technicalities that must not deviate us from the fact that the pickup is by design hum eliminating and low noise and indeed sounding very much like single coils, and yes - good sounding. A very good choice Helmut. Mounting is a bit tricky because their design and mounting differs a lot from usual pickups. Four long screws protrude into the guitar body cavity, supported by a piece of foam to provide spring-action. If you do not pre-drill those screws in the right angle using a stand-drill, the pickup will end up crooked in its cavity. The Bass-Bar is designed in a way that metal flanges are protruding down the top and bottom side, but not on its sides. This yields the awkward situation that you have free vision to everything that´s abiding under the pickup in the cavity. You could see all the cables and stuff traversing the pickup cavity. I helped myself by finding a piece of stiff cardboard slightly smaller than the length of the pickup, painted it black, folded it over two times in a U-shape and this now covers both sides of the pickup nicely. You would not know if you were not told that this is not by design. The pickup is mounted as close to the bridge as practical. This is the position where all string sub-harmonics meet with little phase-cancellation, which guarantees a full tonal spectrum. The Lace produces a very strong bass fundament, so lack thereof is not an issue. In fact time will show if a bass cut of some form is needed beyond amplifier EQ. Back To Index Fretboard And Finish The fretboard was drawn with a CAD program to scale, refined with Gimp to give it a look similar to an old Gibson lapsteel. This is pure frolic of course. This drawing is plotted onto film, which serves as a master for producing a Copyphot aluminium plate painted in black. This thin aluminium sleeve is mounted onto the neck with small nails. . The body of the guitar is finished with Danish Oil as recommended. This allows for small corrections after finish here and there which will inevitably appear on a prototype. I obtained a basic set of nut files to make the grooves on the nut and bridge. Due to the custom string spacing, utilizing a guitar bridge was not a viable option and ended up being made of aluminium stock. I use stock D´Addario strings for standard guitar in suitable gauges, which seem to work well. Back To Index Summary Financially, the guitar is priced (pure material cost only) about the same as a playable commercial item, so it was not a saving per se. However, the materials used (wood, tuners, electric, pickup) are guaranteed to be far, far superior and it exactly match my demands in all details. The making was fun, I did not have to buy many tools, I learned a lot and the result is eminently satisfying. The guitar looks appealing, it feels, plays and sounds very well and I am totally happy with it. Not bad for a fortnight´s effort. Back To Index Sound Samples The
subsequent
recordings have been done using the following
setup:
(Names
copyrighted by the
associated copyright holder)
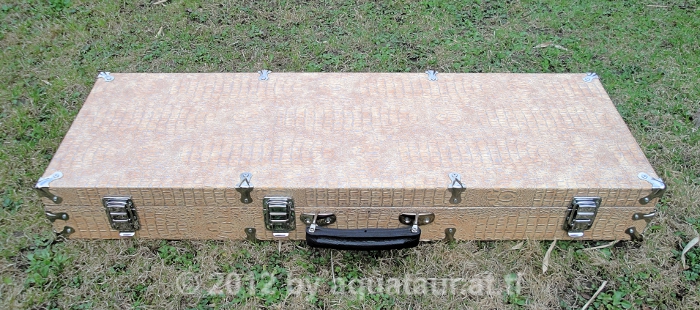
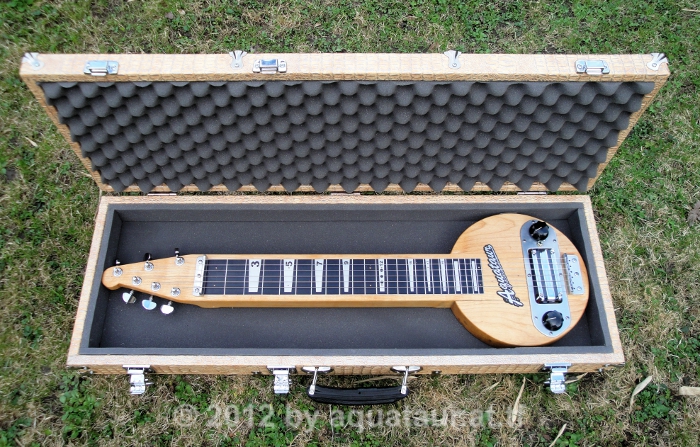
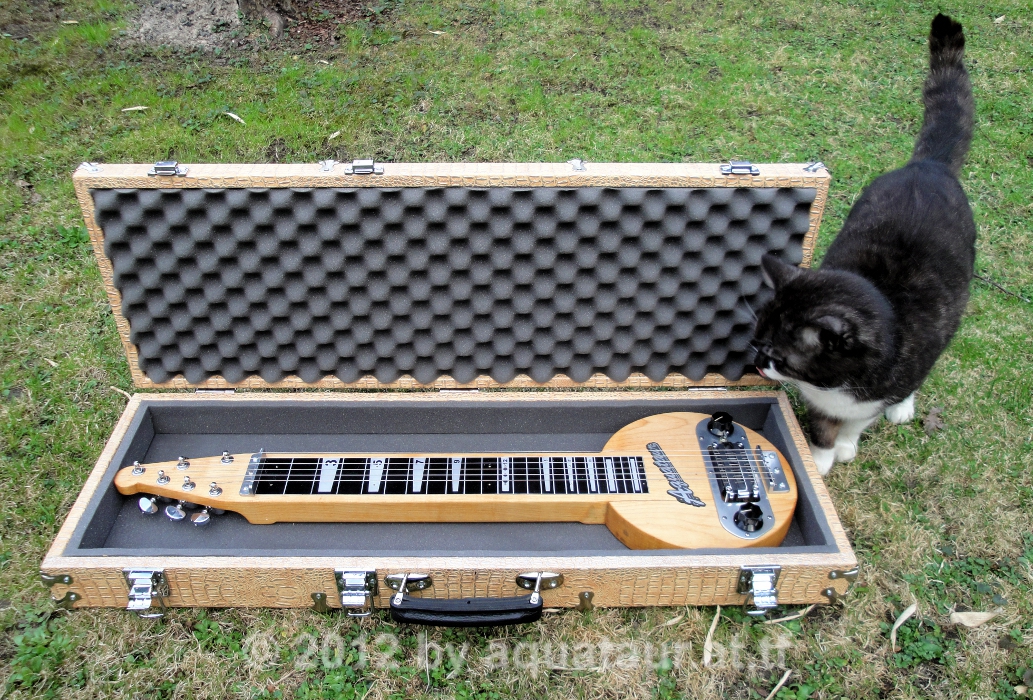
Note on the first verse I use the full coil mode, on the second verse the half coil mode. In the tone control evaluation clips I sweep from center (capacitor defeated) to max (capacitor in resonance) and back for each clip. Note the honky resonance peak particularly in half coil mode. The Case What is a guitar without
a protecting case? A dust-catcher? Where do you put
it when you are not playing it? Martin Koch (the
author of the lapsteel
building book used as reference for the above
build) recommends buying or building a case for
every instrument you build. I agree with him. I
would have bought a case for the lap if one were
available for this size. You get cases for guitars
and basses galore, but not for exotic (truly!)
instruments like lapsteels. Funnily, getting all the
parts (metal parts, wood, tolex, glue, cushion
material) lands you in a price region that is far
beyond an off-the-shelf case (N.B. for guitar), so
making one yourself is never an option if you want
to save money. You cannot compete with far-east mass
produced products.
However, making the case proved most rewarding and satisfactory for me, it was great fun. Total amount of money spent for the case was about EUR 100.- . The case is made of 12 mm wood battens that are joined with a key and slot joint. This is very easy to make with a circular saw and IMHO a far superior and precise joint to dowels, at least when it comes to gluing and joining. The top and bottom plates are made of 6mm birch plywood as suggested by the book. All metal parts are made by Adam Hall. Tolex used is the same heavy duty fabric-lined material I used for the speaker enclosure. Tolex is applied with fast drying white glue (at least for the straight planes ) which holds bombproof. This does not produce toxic fumes, does not attack the tolex material and provides a joint far superior than any solvent based glue I tried. Foam inserts are glued to the wood parts with the same glue. Solvent based glues may degrade the foam material. The oversized conture foam in the lid holds the guitar rock solid in place. As suggested in the book, I balanced the handle so that the case carries straight with the guitar inside. This is much more comfortable for carrying than a center mounted handle. Contrary to some people´s builds, my case appears very lightweight despite its sturdiness and functionality. My 1940´s original Rickenbacker´s wooden case is about the same weight. All in all another very satisfactory build. Back To Index Update History
MAIN PAGE>MUSIC STUFF>LAPSTEEL |
| MAIN PAGE
| MUSIC STUFF | IMPRESSUM (c) 2012-25 AQUATAUR Musik & Elektronik |